LEDmePlay®
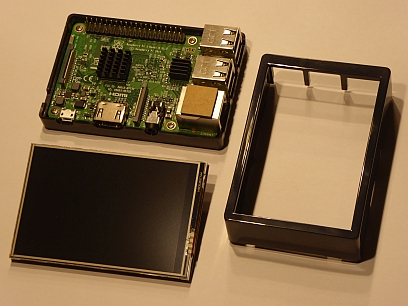
The LEDmePI is a Raspberry Pi 3 Model B with a small touchscreen and an application that lets you upload games to the LEDmePlay®. The LEDmePI makes it easy to switch games on the fly without docking to a computer running the Arduino IDE. The touchscreen is a 3.5 Inch TFT with a resolution of 480x320 pixels. We use a MHS3528. Follow this link or go to the main page lcdwiki for additional information. In principle, you can also use other TFT displays and maybe another Raspberry Pi model. You might have to adapt then the size of the application window. For this, you should be a bit familiar with Python which has been used to develop the application. Python3 should be pre-installed on Raspberry Pi OS.

Manual installation of the software
Display
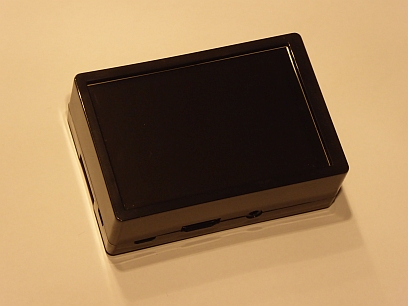
We assume here that you also use a MHS3528 display. If not, please follow to the instruction of your display´s vendor regarding display driver installation. Assemble the case containing the Raspberry and the display and download the latest Raspberry Pi OS with desktop from www.raspberrypi.org. The easiest way is to use the Raspberry Pi Imager.
After successful booting and connecting to a network, we first install the display driver. Open a console and enter the following commands (click on MHS3528 for more information):
sudo rm -rf LCD-show
git clone https://github.com/Lcdwiki/LCD-show.git
chmod -R 755 LCD-show
cd LCD-show
After that you can switch to the 3.5 Inch display by entering sudo ./MHS35-show. If all goes well, the Raspberry Pi reboots and will use the small display. This takes a bit longer than the regular boot process. The screen is cloned to the connected monitor. After that, you should check your desktop options which can be reached by using the right mouse button. Ensure that the menu bar can be overlayed by windows. Otherwise, the LEDmePI software will not fit on the screen.
Arduino Makefile
To build and upload LEDmePlay games, we make use of the tried and tested Arduino Makefile project. In the following step you will install it. Refer to the previous link to GitHub for additional information and detailed instructions. If you just want to install it, open a console and type sudo apt-get install arduino-mk. After that, the Raspberry is in principle ready to run the LEDmePI software.
LEDmePI software and games
Download the application below, unzip it, and copy the contained folder with the name "LEDmePI" to "/home/pi". The games and required libraries must be stored in a folder "sketchbook" in parallel to the "LEDmePI" folder. As described above, you need to add a Makefile by the name "Makefile" without extension to every game folder. Such a file is contained in the "LEDmePI" folder. Just copy it. It must look like this:
ARDUINO_DIR = /usr/share/arduino
ARDUINO_PORT = /dev/ttyACM*
USER_LIB_PATH = /home/pi/sketchbook/libraries
ARDUINO_LIBS = Adafruit_GFX RGBmatrixPanel Timermaster SPI
BOARD_TAG = mega2560
include /usr/share/arduino/Arduino.mk
The * at the end of ttyACM which is a port name ensures that it runs without configuration with every connected LEDmePlay. Ensure that your "sketchbook" folder contains a "libraries" folder which contains the libraries listed in the Makefile (except SPI which is a standard library). The libraries must be in folders named exactly as the names in the fourth line (you might have to rename folders; see Download section below to get the libraries). If the installation of the Arduino-MK Makefile was successful, the last line links to the right location and triggers the build and the upload process.
Your folder-structure should be as follows:
home
|-pi
|-LEDmePI
| |-LEDmePI_V1_0_0.py
|-sketchbook
|-libraries
| |-Adafruit_GFX
| |-RGBmatrixPanel
| |-Timermaster
|-[game1]
| |-[game1].ino
| |-[game1].png
| |-Makefile
| |-readme.txt (optional)
|-[game2]
...
In principle, you can start now the LEDmePI application. However, first ensure that the program is executable. Open a console and type cd /home/pi/LEDmePI/LEDmePI_V1.0.0. Enter chmod +x LEDmePI_V1.0.0.py. After that, you can execute the program with python3 ./LEDmePI_V1_0_0.py. However, it is more comfortable to use a desktop icon which is explained next.
Desktop icon
If you use the LEDmePI, you will normally have no keyboard to navigate to the application and start it (alternatively, it would also be possible to create an autostart but we focus here on a desktop icon). To add an icon, just copy the file ledmepi.desktop from the "LEDmePI" folder to "/home/pi/Desktop". After that a desktop icon appears on the screen and you can start the application by double-click.
How to use it
Before you start, connect your LEDmePlay via an USB cable. Double-click the LEDmePI icon on the desktop to start the application. You can switch between the games contained on the SD card with the two buttons labelled "Last" and "Next". The display shows the title screen of the corresponding game. If you press the "UPLOAD!" button, the game is built automatically and uploaded to a connected LEDmePlay. Build and upload might take some time. If you upload a game for the second time, it is much faster since the previous build is reused and only the upload is performed.
If you want to end the program on the LEDmePI in order to perform a controlled shutdown of the Raspberry Pi (this is always recommended), you have to enter the admin mode (it is hidden since we want to avoid that someone ends the program accidently if we show the device on Makerfaires). Repeat three times click on the "LEDmePI" label followed by a click on the "Mithotronic" label. After that a window with multiple options appears: You can end the program ("End kiosk mode") or shut down the Raspberry Pi ("Shutdown"). Furthermore, you can build all programs in advance to save time if you upload something for the first time ("Build everything"). Of course you can also remove all builds ("Remove all builds").
Download
Link to the LEDmePI application: LEDmePI_V1_0_0.zip
Link to the Adafruit GFX Library: GitHub
Link to the RGB Matrix Pabel Library: GitHub
Link to the Timer library: Timer-Library_V1_3.zip